
单例模式: 定义是单例模式是一种常用的软件设计模式。在它的核心结构中只包含一个被称为单例的特殊类。通过单例模式可以保证系统中一个类只有一个实例。 场景:比如创建连接池的时候,显而易见,连接池在这一个项目中只能存在一个,那…
一、vi编辑文本键盘输入错乱的问题,无法正常和操作Centos一样输入 解决办法: 打开配置: sudo gedit /etc/vim/vimrc.tiny 修改文件内容,增加红色部分set nocompatiblese…
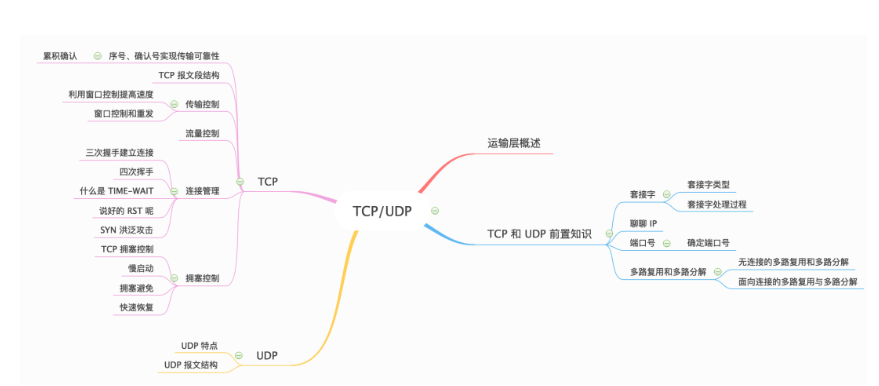
原文标题: 40 张图带你搞懂 TCP 和 UDP 本文转载自公众号:程序员cxuan 前言 那么下面就开始我们本篇文章,文章组织脉络如下 : 运输层位于应用层和网络层之间,是 OSI 分层体系中的第四层,同时也是网络体…
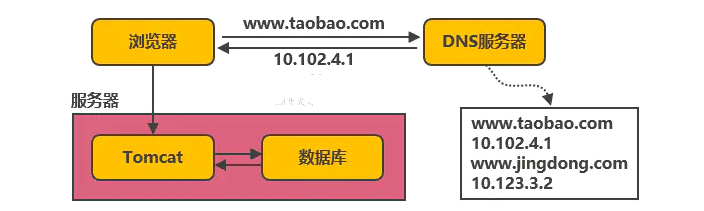
原标题: 服务端高并发分布式架构演进之路 本文以淘宝作为例子,介绍从一百个并发到千万级并发情况下服务端的架构的演进过程,同时列举出每个演进阶段会遇到的相关技术,让大家对架构的演进有一个整体的认知,文章最后汇总了一些架构设…
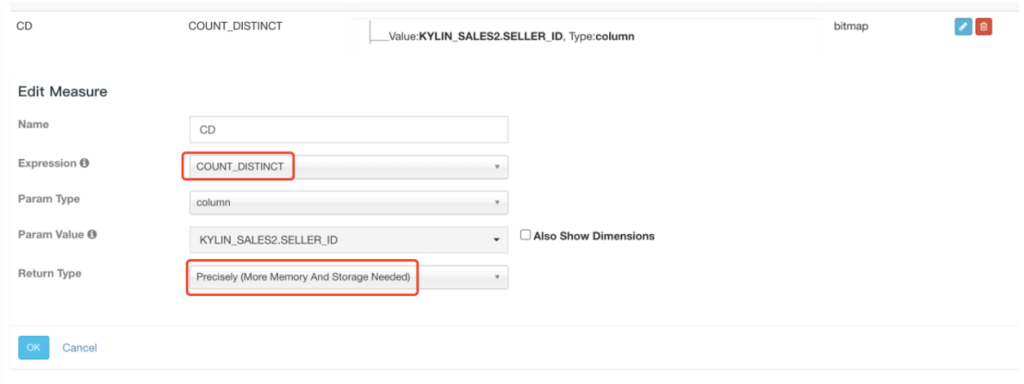
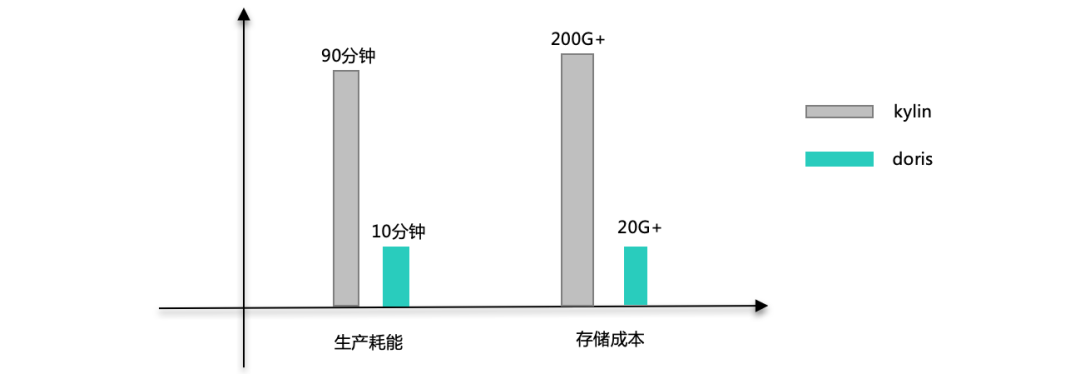
在很多场景中,精确去重是一个重要指标,例如统计 UV。Kylin 从 1.5.3 版本开始支持精确去重。Kylin 使用 Bitmap 实现精确去重,使用全局字典实现字符串到 int 值的映射。 一、背景 当前全局字典介…
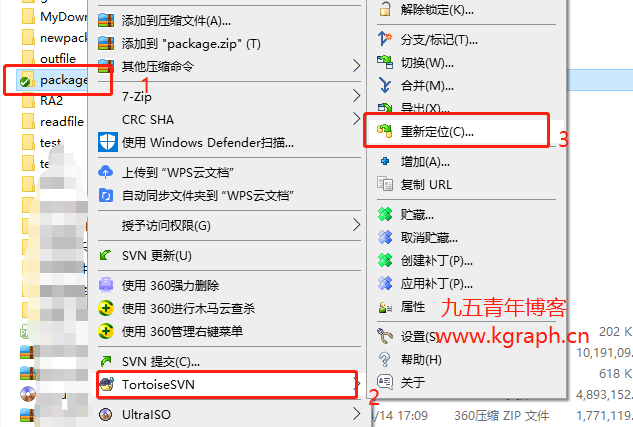
最近公司SVN服务器迁移之后,需要重新修改原来开发工具的SVN配置,以IDEA为主记录一下修改操作。 一、relocate修改本地SVN库 填入新的SVN地址,输入用户名密码即可。 二、idea项目修改svn地址 操作基…
最近公司服务器需要做一次整体规划和服务切分,所以必不可免的需要去迁移一些服务,比如数据库、svn、maven等等都需要迁移。今天,记录一下这次迁移中对于svn迁移的具体流程和迁移后的操作。 一、迁移前准备 我们公司需要迁…

一、GlusterFS简介 GlusterFS(GNU ClusterFile System)是一种全对称的开源分布式文件系统,所谓全对称是指GlusterFS采用弹性哈希算法,没有中心节点,所有节点全部平等。Glust…
1.导语 大家好,我是光城,下面是我之前在gitchat上发布的一个资料,今天全部开源!源码全部存放在本人github仓库,地址:https://github.com/Light-City/dbSyncScheme,欢迎…

DolphinScheduler单机部署分为后端部署和前端部署两部分: 1、后端部署 1.1 : 基础软件安装(必装项请自行安装) PostgreSQL (8.2.15+) or MySQL (5.7系列) : 两者任选…
引言:调度(Scheduling)在计算机领域是个庞大概念,CPU 调度、内存调度、进程调度等都可称之为调度。它是指在特定的时机分配合理的资源去处理预先确定的任务,用于在适当的时机触发一个包含业务逻辑的应用。调度无论在单…
引言 在数字政府领域,许多项目中都有各种类型的文件,它们有不同的大小、不同的用途,甚至编码方式都会千差万别。我们希望通过 OSS 来将这些文件按照一定的规则存储起来,在我们需要的时候,能很快的取出来,并且应用到当前的项目…
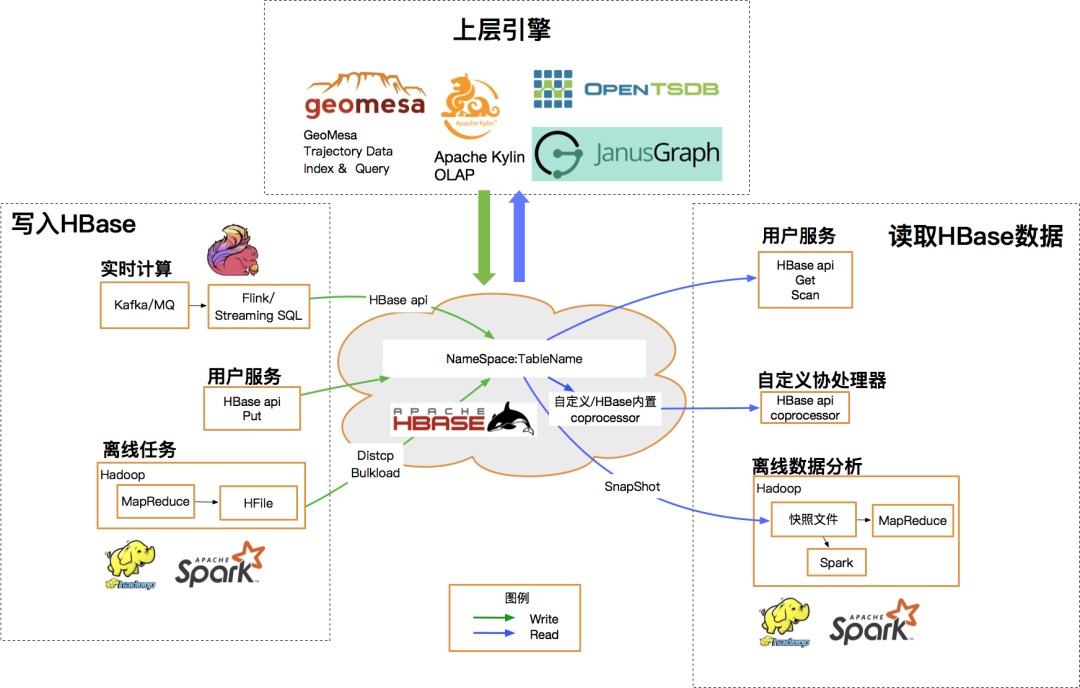
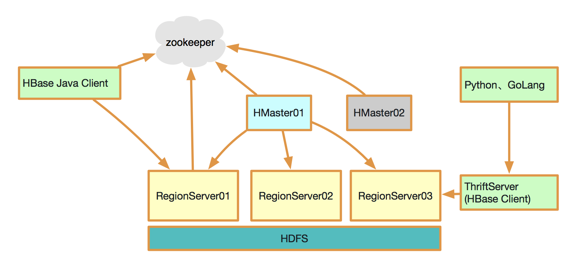
桔妹导读:滴滴HBase团队日前完成了0.98版本 -> 1.4.8版本滚动升级,用户无感知。新版本为我们带来了丰富的新特性,在性能、稳定性与易用性方便也均有很大提升。我们将整个升级过程中面临的挑战、进行的思考以及…
问题 日常开发中,为了避免空指针的调用,经常会出现如下的语句: ...if (someobject != null) { someobject.doCalc();}... 最终,项目中会存在大量判空代码,多么丑陋繁冗!如…
Elasticsearch 在各大互联网公司的应用以及业务解决方案和系统架构分享, ES在各大厂的应用还是很广泛的,包括携程、滴滴、今日头条、饿了么、360安全、小米、vivo等诸多知名公司。 除了搜索之外,结合Kiba…